An important part of API development is to test the APIs thoroughly before we expose them to the world, so we will use postman and test them one by one.
We will be testing the APIs created in the above post with the Http methods, GET, POST PUT AND DELETE
We had created APIs to:
Get All Employees
Get Employee by ID
Create a new employee
Update an existing Employee
Delete an existing employee
All these APIs will access the db and perform the respective operations.
Let’s get started.
Get All Employees
Open Postman in your system and in the url field of postman type 127.0.0.1:8000/api/employees like below.
Creating requests
and press Send button on the right you would see the details of the employee you just added in the below box, I have marked it with Response from API in the above screenshots.
This output or response from API is in JSON format short for JavaScript Object Notation, which is the format used by most of the apis in the world to return a response, this is more human readable and also helps anyone who accesses your API to understand and interpret the data.
The response contains the id (primary key given by Django), first name and last name.
2. Get Employee by ID
From the previous api we can see that there is an id, first_name, last_name in the response, so to get the details of a particular employee, we must pass their id in the url, like this
127.0.0.1:8000/api/employees/1/ Now we will get only the details of the employee with the id(primary key) as 1, so the output will be:
Emplpyee 1 details
3. Create a new employee
To create a new employee, we must use the POST request, so in postman, change the request type to POST and put the url 127.0.0.1:8000/api/employees/, and also pass the details in JSON format(like a python dictionary) in the body tab, and select raw radiobutton there and also change the drop-down to JSON, below this, The new user details to pass is:
{
"first_name":"Test",
"last_name":"User"
}
Take a look at the image shown below and see how it can be done.
Sending POST request
Now click on Send button, the response you would get back is the employee whose detail you have just added along with an id field added by django. Take a look at this response:
Response after adding Employee
Now you can check if this data is added to your table using a GET request like we did in the first point in this page on the 127.0.0.1:8000/api/employees/ .
4. Update an existing Employee
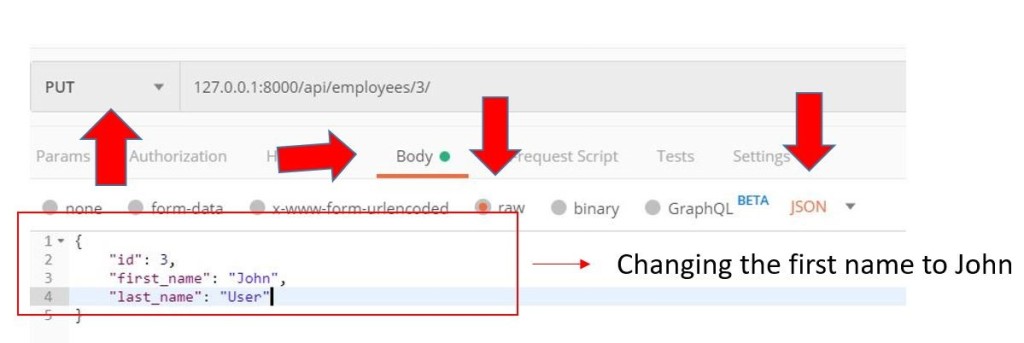
To update an existing employee info, you must send a PUT request along with the employee ID you want to update in url, you must also pass the updated employee details in the body.
Now, as we can see the id of the employee we just created is 3, so let us try updating their first name from ‘Test’ to ‘John’, to do this, change the request to PUT in postman first and give the url as 127.0.0.1:8000/api/employees/3/. You can have a look at the screenshot below:
Looking at the response, we can see that the employee record with the id of 3 is updated:
5. Delete an existing employee
To delete an employee, you must do the same steps as above except that you would not need to pass in any body in request, just the employee id you want to delete in the URL. So let us try to delete the employee with the id 3 that we just updated. To do this, change the request type to DELETE and the URL would be 127.0.0.1:8000/api/employees/3/ . But unlike the previous request this one does not return a response since the record is deleted. Have a look at this screenshot.
DELETE Employee
Now you can have a look at the admin page or go to the 127.0.0.1:8000/api/employees/ in postman and do a GET request to see the records to verify whether the record is deleted.
Thank you for spending some time to read my blog, please do leave a comment about how you feel about this blog and any improvements that should be done, also do share with your friends. Thanks again. 🙂
Hi everyone, this is my new blog post on how to create CRUD(Create, Read, Update and Delete) APIs using Django.
Introduction:
This is a sample employee management application for you to follow to get started with Django’s APIs. Here we are trying to create an employee management system with python3 APIs and sqlite3 database in the backend. We would be using the Django admin page also to manage our database.
What we will build?
Our RESTful API will have simple CRUD functionality with 5 endpoints.
Get All Employees
Get Employee by ID
Update an existing Employee
Create a new employee
Delete an existing employee
PART 1: Setting up a Django project
Steps:
Creating a virtualenv (Virtual Environment):
The first step is to create a virtual environment, for this you must have python installed in your system. Please do lookup on installation steps for python3.
Then in your terminal (command prompt), create a directory named venvs with this command
C:\Users>mkdir venvs
I will be using this > symbol to denote any code to be written on the terminal.
Next change into this newly created directory with >cd venvs in your terminal, now to create the virtual environment.
For python 3 users the command is >python –m venv employees_project
2. Activating the virtualenv:
Now we must activate this virtual environment we created, to do this you must first cd into the Scripts folder >cd employees_project\Scripts\ now just type >activate , you would see on your terminal the name of your environment surrounded by brackets.
Virtual Environment name is displayed before C:\ means it is activated
If you see a similar kind of output then you have successfully activated your virtual environment.
3. Installing the required packages:
The first package we would need is Django itself since it does not come pre-installed with python. To install the package just type pip install Django, you must see an output like this.
Install Django in Virtual Environment
4. Create a Django Project:
Now just cd out of the venvs folder using >cd .. and then in the terminal run the command
> django-admin startproject employees_app
this will not give you an output but you can see a directory with the name employees_app existing in your current folder.
5. Now cd into this folder and you can see a manage.py file here, this is Django’s main file and many of django’s app commands run with this. So to test your application just run
> python manage.py runserver
Start django server
As you can see a server is started locally, at the address http://127.0.0.1:8000/ now just open a browser and go to this url, you can see django’s default home page, it should look like this.
This page tells you that your Django project succeeded in loading.
6. Setting up the database
Python by default supports the sqlite3 db and that’s what we will be using to integrate Django and the APIs.
Django by default has a few tables defined for internal processing. First we must initialize (create) them using the command >python manage.py makemigrations , this would create a python file that keeps track of the current changes made to the db and stores these files in a folder called migrations.
The next step is to apply these migrations so we must use the command >python manage.py migrate , it should produce the following output.
To check the tables created we must first create a super user, this is like the admin who has access to all pages of the site without restrictions. So to create this, run the command
>python manage.py createsuperuser
It will ask for a username and password, you may set it up according to your will. Now, in your browser go to the url https://127.0.0.1:8000/admin/ and use the username and password credentials you had just provided to log in.
Once you login you would see a page like this:
Here we can see that there are two tables Groups and Users, you may click on users and you can see the superuser record created here, these two tables always come with base Django install. However, Django also provides us a facility to create our custom db tables too which we would see very soon.
7. Setting up Custom Employee table
To set up our custom database tables, we must create our custom app first, I will call the app’s name as ‘core’, however it is up-to you to give any name. To create an app run the command >python manage.py startapp core . Before we proceed further, let us look at the folder structure after this command.
As we can see from the above image it has created a folder called core and inside it are various python files. Now to create an Employee table, go to the models.py in this folder and write the following code.
from django.db import models

# Create your models here.
class Employee(models.Model):
    first_name = models.CharField(max_length=50)
    last_name = models.CharField(max_length=50)
Now what this code means is that you are creating an Employee class with the fields first_name and last_name.
The next step is to open the employees_app folder, here you will find a settings.py file, just add the app name core here as shown below.
Add core app to settings.py
To make this class we had created in models.py into a table we must run the migrations like we had done previously. So now in your terminal run the command
>python manage.py makemigrations
The output should be like this:
Creating Migratons
Now Django knows it must create a table, the next step is to migrate the db, this will create an empty table in your db. So in your terminal, type the command below.
>python manage.py migrate
The output should look something like this:
Applying migrations
Now to show any table you create on the admin page, you must make an entry in the admin.py file in the core/ folder. Write this code there
from django.contrib import admin
from .models import Employee

# Register your models here.
admin.site.register(Employee)
Then run the server if it’s not already running with >python manage.py runserver .
Now in your browser just refresh the admin page, you should be able to see the Employees table under core created. It must look something like this.
Congratulations!! On making it this far, next we would need to create APIs to access our db and test them with Postman software, make sure you have it downloaded and installed 🙂
PART 2: CREATING APIs
Definition: API is the acronym for Application Programming Interface, which is a software intermediary that allows two applications to talk to each other.In Django to create APIs there is a framework called Django Rest Framework.
Steps to set it up are:
Install the package in your terminal. With virtualenv (Virtual Environment) activated, run the command in the terminal (command prompt) >pip install djangorestframework . Once it is installed you can check it on the terminal with the command pip freeze, it will show you the list of packages installed on the current virtualenv, like below.
2. Now create a separate app called api from your terminal, using the command
> python manage.py startapp api .Now you should be able to see a folder named api with various files created in your project structure, check the screenshot below:
api folder created
3. The next step is to create serializers for our models
Definition: Serializers allow complex data such as querysets and model instances to be converted to native Python datatypes that can then be easily rendered into JSON or XML or other content types. Serializers also provide deserialization, allowing parsed data to be converted back into complex types, after first validating the incoming data
So open the ‘core’ folder and create a new file called serializers.py.Here we are using a model serializer to serialize our Employee model created in models.py. You can paste the below code
# from our base installation
from rest_framework import serializers
# from models.py imported here
from core.models import Employee

class EmployeeSerializer(serializers.ModelSerializer):
    class Meta:
        # the model to serialize
        model = Employee
        # fields in model to serialize
        fields = '__all__'
4. Next go to the views.py in the api folder, this is where we create views which get called for each API’s url.
Before we create API we must know the various HTTP request methods we would use:
GET – To fetch employee data
POST – To create an employee’s data
PUT – To update an employee’s data
DELETE – To delete an employee’s data
i. So first we will create a class called EmployeeList which contains methods(python functions) that lists out employee data as well as creates an employee record. In your views.py put this code, do note that I have commented which method does what.
from django.shortcuts import render
from django.http import HttpResponse, QueryDict, Http404
from django.views.decorators.csrf import csrf_exempt

import json

from core.models import Employee
from core.serializers import EmployeeSerializer
from rest_framework.response import Response
from rest_framework import status
from rest_framework.views import APIView

# Create your views here.
# For Employee Listing API
class EmployeeList(APIView):
    """
    List all Employee, or create a new Employee.
    """
    @method_decorator(csrf_exempt)
    def dispatch(self, request, *args, **kwargs):
        return super(EmployeeList, self).dispatch(request, *args, **kwargs)

    # get all employees
    def get(self, request, format=None):
        snippets = Employee.objects.all()
        serializer = EmployeeSerializer(snippets, many=True)
        return Response(serializer.data)

    # create a new employee
    def post(self, request, format=None):
        serializer = EmployeeSerializer(data=json.loads(request.body))
        if serializer.is_valid():
            serializer.save()
            return Response(serializer.data, status=status.HTTP_201_CREATED)
        return Response(serializer.errors, status=status.HTTP_400_BAD_REQUEST)
The dispatch method is used here to exempt csrf(cross site request forgery) checks, which Django does for the POST method.
ii. The next class is EmployeeDetail this class contains GET, PUT and DELETE methods so all these operations would be performed on only a single employee.
In the same file write the code for this class:
# For Employee Detail API
class EmployeeDetail(APIView):
    """
    Retrieve, update or delete a Employee instance.
    """
    @method_decorator(csrf_exempt)
    def dispatch(self, request, *args, **kwargs):
        return super(EmployeeDetail, self).dispatch(request, *args, **kwargs)

    # query Employee table to get the object of employee by primary key
    def get_object(self, pk):
        try:
            return Employee.objects.get(pk=pk)
        except Employee.DoesNotExist:
            raise Http404

    # get details of employee requested
    def get(self, request, pk, format=None):
        snippet = self.get_object(pk)
        serializer = EmployeeSerializer(snippet)
        return Response(serializer.data)

    # update the details of employee requested
    def put(self, request, pk, format=None):
        snippet = self.get_object(pk)
        serializer = EmployeeSerializer(snippet, data=json.loads(request.body))
        if serializer.is_valid():
            serializer.save()
            return Response(serializer.data)
        return Response(serializer.errors, status=status.HTTP_400_BAD_REQUEST)

    # delete the employee record of employee requested
    def delete(self, request, pk, format=None):
        snippet = self.get_object(pk)
        snippet.delete()
        return Response(status=status.HTTP_204_NO_CONTENT)
5. Next create a urls.py file inside the api folder, we will use this file to link up the classes we created to a url so that we can access them via postman.
After creating the file your folder structure should look like this:
urle.py file created under api folder
Now inside the urls.py file, we will define the urls like this:
from django.urls import path, include
from .views import *

urlpatterns = [
    path('employees/', EmployeeList.as_view()),
    path('employees/<int:pk>/', EmployeeDetail.as_view())
]
The path method specified the urls available in our project’s api app, also as you would have noticed, we are using the as_view() method after our class just to let Django know to render the class as a view.
6. The next step is to include both these urls to the main project’s urls. So you must open the employees_app folder and there you can find a urls.py file, the folder structure is as below:
urls.py inside employees_app
Now in this file there would already be a url defined by Django as admin/ below that add this code, path(‘api/’, include(‘api.urls’)) , so now your entire urls.py code should look like this.
from django.contrib import admin
from django.urls import path, include

urlpatterns = [
    path('admin/', admin.site.urls),
    path('api/', include('api.urls'))
]
7. The one last step here is to add ‘rest_framework’ that we had done a pip install earlier and ‘api’ which is the app that we just created to the installed apps in settings, this is for Django to recognise them. Just like shown below
8. Testing an api, now run the server in your terminal with the command >python manage.py runserver . Now we will test the employee/ url and what it does is gets you all employees data, but our table is empty, so first we must add some data using the admin panel. So go to the url Click on the Employees link there:
In the next page that appears, click on Add Employee button,
Then give a first name and last name and click on Save button, you will get a message that the employee was added successfully, also you can notice that an object was created below in the table.
Thank you for spending some time to read my blog, please do leave a comment about how you feel about this blog and any improvements that should be done, also do share with your friends. Thanks again. 🙂
Hi there, I am a python developer with 3 years of work experience and this is my first blog, I would like to share with you some resources to learn python 3 from.
Python is a very easy-to-learn and open-source language, it’s syntax is also very easy to understand. When I had started learning python I had great difficulty in deciding what to learn, where to learn from and went through a lot of sites, books, tutorials and eventually would end up maybe starting all over again. Back then I started with python 2 and also kept hearing from people that python 3 was also on it’s way, so just imagine the situation I was in, many questions were popping up in my head, Which one to learn python 2 or 3? Whether this language would land me a job? Will I be able to completely master it?. Well, it turns out it is a very easy language and anyone with or without knowledge in programming can learn it.
I guess today the readers of this blog wouldn’t need to get confused anymore as officially it is announced the python 2’s improvements would come to an end; source: Sunsetting Python 2 , while python 3 has rapidly been gaining momentum in the software industry, I guess it is a good choice, for beginners to start off with python 3.
Below are some of the resources which I have used to learn and continue to refer to use to improve myself everyday.
Resources:
Learning:
The site: py4e (python for everyone), here there are 17 lessons to learn, from basics including why we program up-to data visualization, do explore the site, it is really great place to get started.
Python Official Documentation also has a tutorial which you can use to learn and refer also to the syntax of python methods and classes.
Practicing: To become good in a programming language involves a lot of practice too:
Practicing Locally: You can download and install python 3 from their official site here: python.org on your system and run your new programs, this way it will help you experiment and learn.
HackerRank: While learning python as a beginner, I would like to suggest you to sign up and solve problems on this website, it is a great place to start practicing, you can go to the site and choose practice on the top navigation and then choose python, there are problems for each topic in python.
HackerEarth: This is also a really good site, but I would like to recommend you to take up these challenges once you are quite good with python, since these exercises are a bit difficult for a beginner to understand and solve them, but if you’re up for the challenge then go ahead 🙂 .
Q & A site: StackOverflow is a great place to find answers to most of your programming questions, just google up how to, or what is and usually stackoverflow is the first link that pops up, you can ask questions as well, but make sure you look it up first, maybe someone has asked the same question on this site before too.
Thank you for spending some time to read my blog. I hope these resources help you to get started with python.